1NaPqtW9P7558JUxGwhyVEJbqCUfv6JFYg
Uninstall 1NaPqtW9P7558JUxGwhyVEJbqCUfv6JFYg from Firefox
These dll files happen to infect because of 1NaPqtW9P7558JUxGwhyVEJbqCUfv6JFYg lmhsvc.dll 6.0.6000.16386, usrlbva.dll 4.11.21.0, sisbkup.dll 6.1.7601.17514, authcert.dll 7.0.6001.18000, GdiPlus.dll 5.2.6001.22791, httpmib.dll 7.0.6001.18000, hotplug.dll 5.1.2600.2180, pstorec.dll 6.1.7600.16385, dispci.dll 6.0.6000.16609, wmi-appserver.dll 7.5.7600.16385, shsvcs.dll 6.0.6000.16386, setupqry.dll 5.1.2600.0, rtcdll.dll 5.2.4949.5512, xpob2res.dll 0, wmiutils.dll 6.0.6000.16386Delete 1NaPqtW9P7558JUxGwhyVEJbqCUfv6JFYg Easily From The Windows System
Security analyst recently detected 1NaPqtW9P7558JUxGwhyVEJbqCUfv6JFYg named computer threats spread over Internet that is capable to target all Windows System. With all the bad intention to ruin down Windows System performance and allow cyber criminals to remotely access the Windows System crooks has designed this threats and worrying is that widely spread over Internet. Soon after coming inside the Windows System it hijack the browsing application including the most popular and now after without permission changes the current homepage and search webpage according to its need. It cause unwanted redirection, shows number of ads as well as it is capable to monitors your Internet activity so your personnel detail are too under threats till 1NaPqtW9P7558JUxGwhyVEJbqCUfv6JFYg presence inside your Windows System.
Coming to intrusion methods, 1NaPqtW9P7558JUxGwhyVEJbqCUfv6JFYg mainly comes inside your Windows System through bundled with freeware or shareware program. In addition, opening spam email attachments, visit to infected websites alike porn sites and torrents, clicks to suspicious ads and offers and nevertheless watching videos and playing games online result in its intrusion. After its intrusion browsing activity as well as Windows System performance slows down. Some application fails to open and also private information are under threats. So, you are strongly recommended to delete 1NaPqtW9P7558JUxGwhyVEJbqCUfv6JFYg as soon as possible.

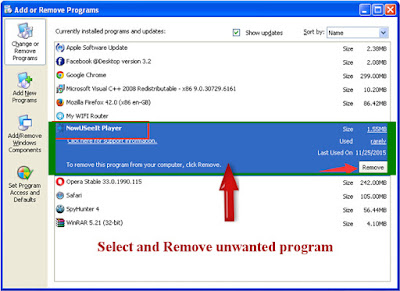
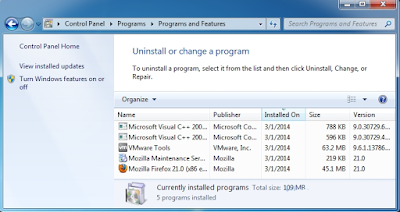
Step 1: Delete 1NaPqtW9P7558JUxGwhyVEJbqCUfv6JFYg From Control Panel
Delete 1NaPqtW9P7558JUxGwhyVEJbqCUfv6JFYg From Windows XP
- Click on Start Menu >> Go to Control Panel option.
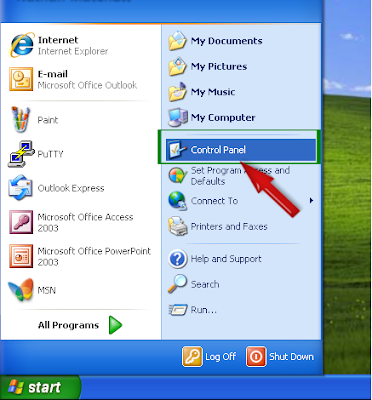
- Choose program category >> Click on Delete program.
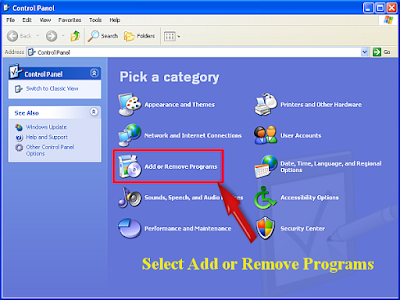
- Search and Delete unwanted program from Windows System.
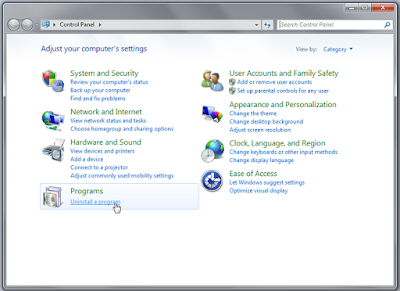
Delete 1NaPqtW9P7558JUxGwhyVEJbqCUfv6JFYg From Windows Vista
- Go to Start Menu >> Choose Control Panel option.

- Go to program category >> Click on Delete program.

- Choose the suspicious programs from list >> Delete 1NaPqtW9P7558JUxGwhyVEJbqCUfv6JFYg.

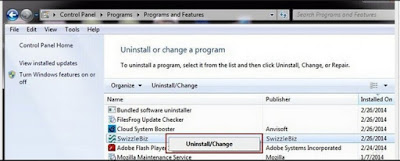
Delete 1NaPqtW9P7558JUxGwhyVEJbqCUfv6JFYg From Windows 7
- Open control panel by navigating Start Menu.
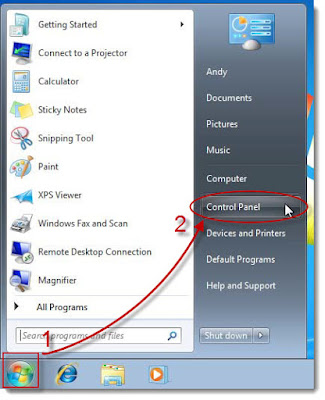
- Select program option from control panel >> Delete 1NaPqtW9P7558JUxGwhyVEJbqCUfv6JFYg.

- In program window, search other related program >> Delete them safely.

Delete 1NaPqtW9P7558JUxGwhyVEJbqCUfv6JFYg From Windows 8
- Go to right edge of computer screen.
- Press Search button >> Type Control Panel.
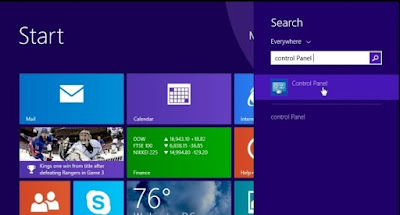
- Click on program category >> Select Uninstall a programs option.

- Delete 1NaPqtW9P7558JUxGwhyVEJbqCUfv6JFYg to make Windows System safe and secure.
Delete 1NaPqtW9P7558JUxGwhyVEJbqCUfv6JFYg From Windows 10
- Click on Start button >>Find Control Panel in the Search Box.
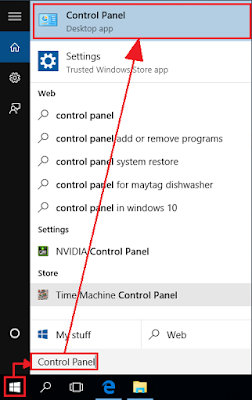
- Choose Programs >> Go to Delete a Program option.
- Delete all 1NaPqtW9P7558JUxGwhyVEJbqCUfv6JFYg related programs.
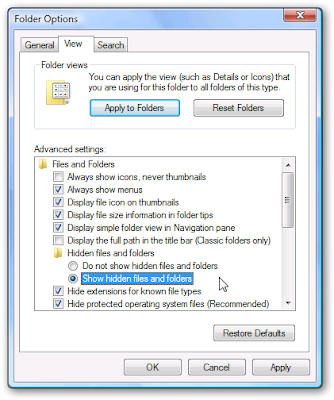
Delete 1NaPqtW9P7558JUxGwhyVEJbqCUfv6JFYg From Windows XP
- Click on My Computer.
- Click on Tools menu >> Folder Options.
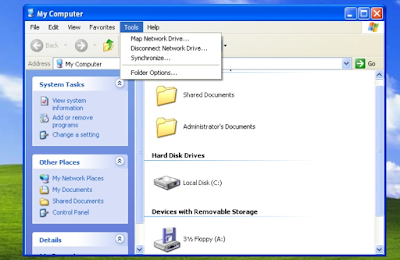
- From Folder Options window >> Click on View tab.
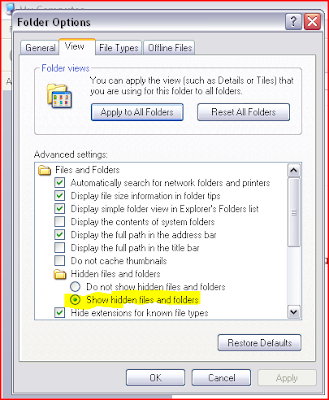
- Under Advanced Settings >> Select Show hidden files and folders.
- Click Apply, then OK.
Delete 1NaPqtW9P7558JUxGwhyVEJbqCUfv6JFYg From Windows 7
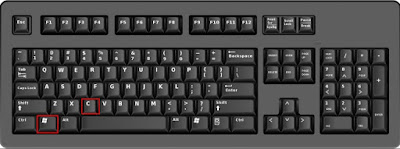
- Press Windows Key + E.
- Click Organize in the top left corner.
- From drop-down menu >> Select Folder and search options.
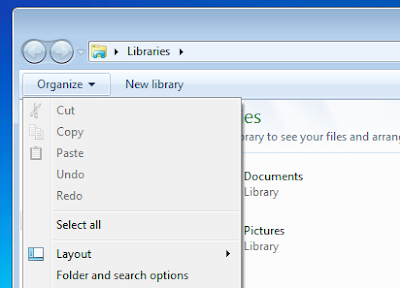
- Under Folder Options window >> Select the View tab.
- Locate the Advanced settings.
- Under the Hidden files and folders >> Select Show hidden files and folders.
- Click Apply, then OK.
Delete 1NaPqtW9P7558JUxGwhyVEJbqCUfv6JFYg From Windows 8/10
- Press the Windows Key + E.
- Select the View tab in top left corner.
- Locate and click Options on the right side>> Select Change folder and search options.
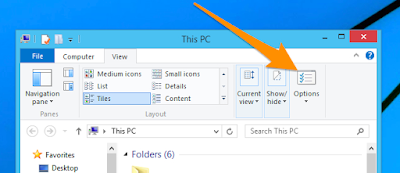
- Select Show hidden files, folders and drives under Hidden files and folders.
- Click Apply, then OK.

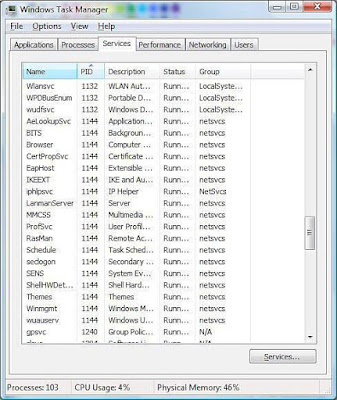
Delete 1NaPqtW9P7558JUxGwhyVEJbqCUfv6JFYg From Windows XP/Vista/7
- Press Alt+Ctrl+Del button altogether to open Task manager.
- From Processes Tab, select all process related to 1NaPqtW9P7558JUxGwhyVEJbqCUfv6JFYg >> Click on End Process.
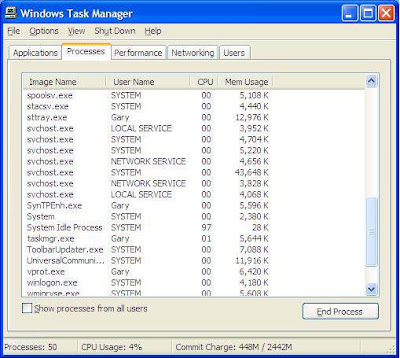
- Go to Services Tab and then stop unknown services immediately.
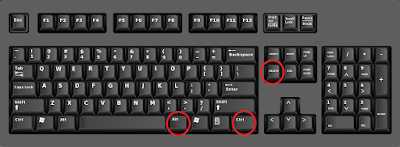
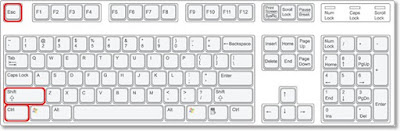
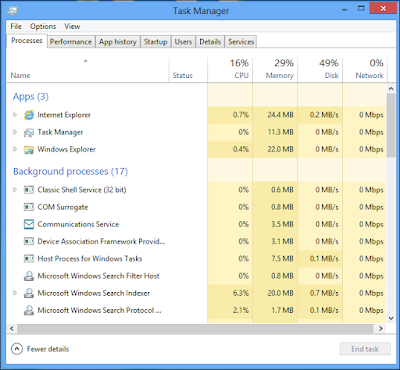
Delete 1NaPqtW9P7558JUxGwhyVEJbqCUfv6JFYg From Windows 8/8.1/10
- Press Ctrl + Shift + Esc button concurrently to open Windows Task Manager.
- Go to Process tab. Find all 1NaPqtW9P7558JUxGwhyVEJbqCUfv6JFYg related process >> Click on End Process.
Delete 1NaPqtW9P7558JUxGwhyVEJbqCUfv6JFYg From Windows 8
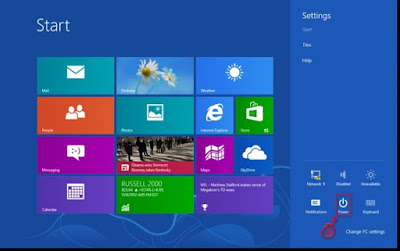
- Press Windows key + C, next tap settings.
- Click Power, hold down Shift on keyboard >> Then tap Restart.
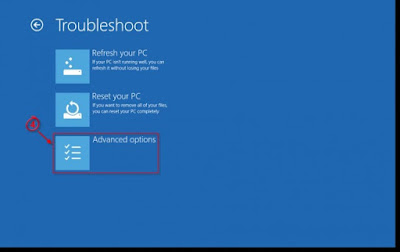
- Tap Troubleshoot.

- Click Advanced options.
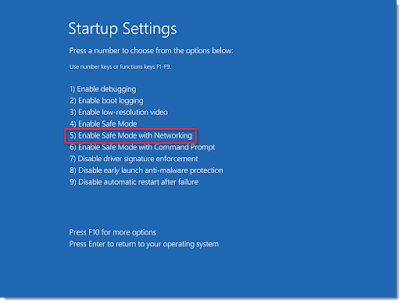
- Tap Startup Settings.

- Click Restart.

- Press 5 from keyboard to Enable Safe Mode with Networking.
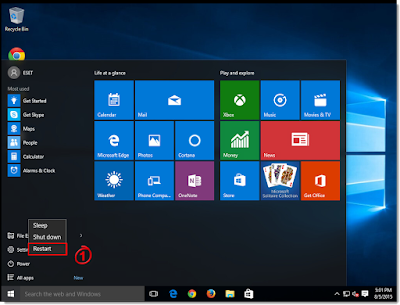
Delete 1NaPqtW9P7558JUxGwhyVEJbqCUfv6JFYg From Windows 10
- Click Start >> Tap Power and keep holding Shift key >> Tap Restart.
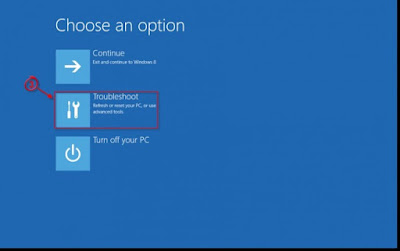
- Now Tap Troubleshoot option.
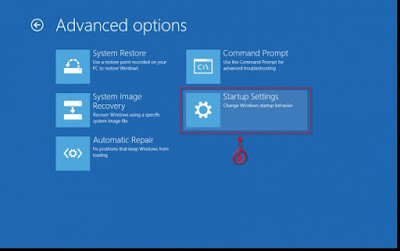
- Click Advanced options from Windows System screen.

- Click at Startup Settings.
- Now, tap Restart button.
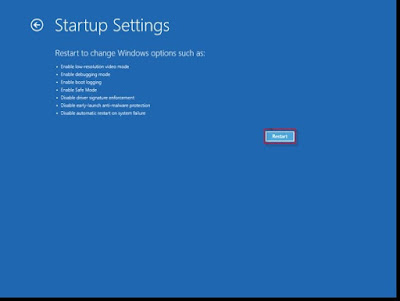
- Press 5 to select Safe Mode with Networking.
- Enter your User-name and password to start Windows in Safe Mode with Networking.
Delete 1NaPqtW9P7558JUxGwhyVEJbqCUfv6JFYg From Windows XP/Vista/7
- Click on Start menu >> Select Restart button.
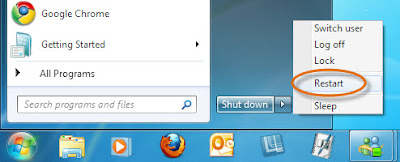
- Press F8 button during Windows System start booting.
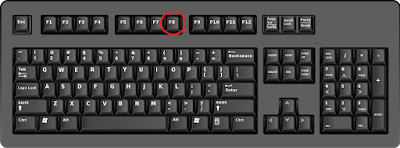
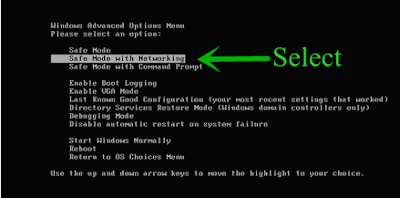
- Here you will see Advance boot menu on Windows System screen.
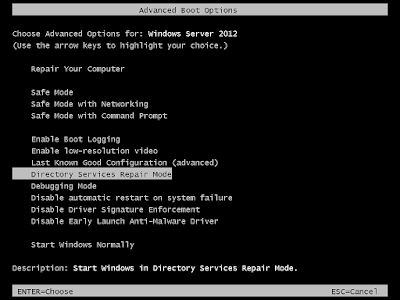
- Select Safe Mode With Networking Option >> Now press Enter button.
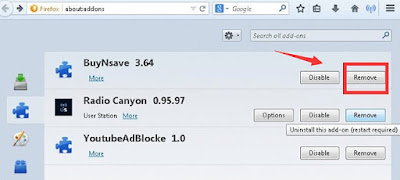
Delete 1NaPqtW9P7558JUxGwhyVEJbqCUfv6JFYg From Mozilla Firefox
- Open Mozilla Firefox browser.
- Click on gear icon to open menu.
- Select Add-ons, after which Add-ons Manager tab appears.
- Choose Extensions or Appearance panel.
- Choose 1NaPqtW9P7558JUxGwhyVEJbqCUfv6JFYg add-on you want to Delete.
- Click the Delete button.
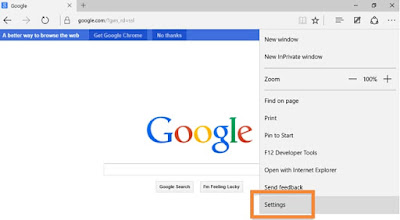
Delete 1NaPqtW9P7558JUxGwhyVEJbqCUfv6JFYg From Microsoft Edge
Microsoft Edge doesn't support extension so you need to reset your browser homepage.
- Open Microsoft Edge browser.
- Click on More (...) icon >> Go to Settings.
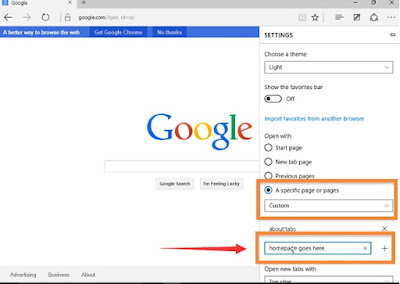
- Select specific page or pages under Open option.
- Select Custom option.
- Enter URL you want to set as your browser homepage.
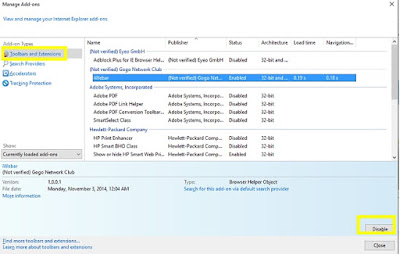
Delete 1NaPqtW9P7558JUxGwhyVEJbqCUfv6JFYg From Internet Explorer
- Open Internet Explorer browser.
- Click on Gear Icon to open Tools.
- Click on Manage Add-ons option.
- Select Toolbars and Extensions tab.
- Find 1NaPqtW9P7558JUxGwhyVEJbqCUfv6JFYg related add-ons >> Click Disable.
- Click More information button >> Click on Delete button.
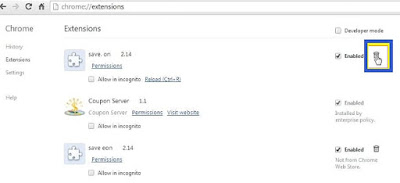
Delete 1NaPqtW9P7558JUxGwhyVEJbqCUfv6JFYg From Google Chrome
- Click on great icon to open Chrome menu.
- Now click on the Tools option.
- Go to Extension >> Select unwanted extension of 1NaPqtW9P7558JUxGwhyVEJbqCUfv6JFYg.
- Finally click on trash bin icon.

No comments:
Post a Comment